Follow Sam and Sofia on a Road Trip Across the USA!

Source: http://www.littlepassports.com

Little Passports - A Global Adventure


Follow Sam and Sofia on a Road Trip Across the USA!

The arrival of summer means a lot of things: no more school, longer and hotter days, plus all the ice cream your parents will let you eat! It also means time to vacation. Sam & Sofia love traveling all over the globe, but as our USA Edition subscribers know, the United States is also chock full of places to explore. One of the best ways to explore them is by packing up the car and hitting the road. We planned a three-day road trip to take you to some of our favorite destinations in different corners of the U.S.  Our only rule? Buckle up!

ROAD TRIP DAY 1: The South & the East Coast

Our first day started in space and ended in a coastal spot that took us back to the days before iPads, computers and cell phones existed. To our surprise, it was just as much fun.

U.S. Space & Rocket Center – Huntsville, AL


A full day’s worth of cool discoveries awaits you at the U.S. Space & Rocket Center, the official visitor center for NASA’s Marshall Space Flight Center. It is also the site of the country’s first Space Camp, which hosts popular programs for kids and grown-ups alike.

Lift off at the Main Exhibit to see original Mercury and Gemini capsule trainers used by US astronauts in the 1960s. Imagine yourself in orbit in the space travel simulator, then head to the Saturn V Hall to check out the Saturn V Rocket, one of only three still in existence. These rockets launched astronauts into orbit between 1966 and 1973 and remain the tallest, heaviest and most powerful rockets ever to be used! Outside, Shuttle Park brings you up close to a full-scale space shuttle. At the end of your visit, kick back with a movie at one of the center’s three space-themed theaters, including the IMAX Spacedome.

New Jersey Boardwalks — The Jersey Shore


New Jersey’s iconic beach boardwalks bring you back to Earth—and back in time. Boardwalks started in Atlantic City, where the first stretch of elevated walkway was built in 1870. Today New Jersey boasts some two dozen of these coastal wooden pathways (the most in the U.S.), each with its own colorful mixture of carnival games, amusement park rides and classic boardwalk food, like saltwater taffy and calzones. Families especially love Jenkinson’s Boardwalk at Point Pleasant Beach, which contains tons of fun rides (like a carousel, a Tilt-A-Whirl and a sky-high Crazy Bus) and an aquarium filled with sea creatures. Another favorite is the two-and-a-half-mile long Wildwoods Boardwalk in southern New Jersey, which has three amusement park piers, three beachfront waterparks, electric Sightseer Tram Cars and hosts the National Marbles Tournament every June!

ROAD TRIP DAY 2: The Midwest & The West

On day 2 we drove from the middle of the country to one of the first frontiers of the American West, exploring history that’s both sweet and spooky.

Funks Grove Pure Maple Sirup — Funks Grove, IL


Your sweetest stop yet! It’s located on Historic Route 66, the famous U.S. highway that runs for nearly 2,500 miles between Chicago and Santa Monica. That’s where the Funks of Funks Grove Maple Sirup began making their namesake treat way back in 1824. That’s when Isaac Funk staked out a piece of land for its fertile soil, and ample amounts of water and timber. Isaac’s grandson, Arthur, opened the first commercial sirup farm there in 1891 and the business has been passed down through the family ever since. Arthur’s cousin, Hazel Funk Holmes, declared her desire to keep the spelling of “sirup” with an “i” and included this wish in her will to ensure it would remain so forever. At the time, this special spelling indicated that no extra sugar was added to the irresistible gooey liquid. Today you can taste the difference when you visit the shop.

St. Elmo Ghost Town — Chaffee County, Colorado


Don’t worry; even though St. Elmo may be called a ghost town, it isn’t spooky! St. Elmo is often referred to this way because eventually, all of its citizens moved away and left the town abandoned! St. Elmo, founded in 1880, was like many other Colorado towns that sprung up during the mining boom. Gold and silver miners rushed to the state eager to find their fortunes and they needed a place to stay, so communities of houses, general stores and livery stables were quickly built. Many of these new towns were abandoned once the supply of riches dwindled. St. Elmo is one of the best-preserved of these towns, and day trippers continue to visit its old-timey streets. Make sure to stop by St. Elmo General Store for ice cream and a fun mix of souvenirs and antiques. If you’re feeling adventuresome, rent a four-wheeler to tackle nearby dirt roads or search for the town’s last remaining residents—chipmunks!

ROAD TRIP DAY 3: The Southwest & California

Our last day brought us to the other side of the country, where we camped in an unusual desert motel and hunted for treasure at a California beach!

Wigwam Village Motel #6 — Holbrook, AZ


Try saying the name five times fast. Then stretch your legs—and maybe stay the night—at this funky attraction, located off Route 66 in the hot Arizona desert. You might think the fifteen concrete-and-steel cone-shaped abodes look more like teepees than traditional wigwams, and you’re right. The structures are indeed shaped like teepees, but the architect Frank Redford, who pioneered the original design and village in Kentucky in 1937, preferred the name “wigwam”, and it stuck. A year later, in 1938, a man named Chester E. Lewis bought the plans and went on to build seven more Wigwam Villages around the country. The Arizona motel is one of only three remaining today (the others are in Kentucky and California). Each wigwam has original handmade hickory furniture and one or two beds, with a small bathroom.

Glass Beach — Fort Bragg, CA


The sparkle on this stretch of Mendocino County coast came from a most unlikely source: discarded trash. Starting in the early 1900’s, residents used the beach as a dump, throwing everything from cans and bottles to appliances, and even old cars, over the cliffs and into the ocean. Luckily, in 1967, the California state government put an end to the dumping because of the harm it was doing to both the ocean and coastal ecosystems. Over time, the sea has churned back the glass and debris and today the shore glitters with millions of colorful glass “pebbles” that have been tumbled smooth by the pounding waves. Kids and adults alike enjoy searching the shore to search for rarer pieces like “ruby reds”, fragments of old car tail lights, or “sapphire gems,” hunks of blue apothecary bottles. Make sure to take only pictures of what you find, though; the beach is now a state park, so pocketing your discoveries is not allowed. Treasure the memory instead and help preserve the beach’s unique beauty for future visitors to enjoy!

Learn more about these states and more when you subscribe to our USA Edition! http://bit.ly/1lKPfhb

1 Comment

Filed under Little Passport Adventures, Road Trip Across the USA

Tadpole Changing

Source of Inspiration

Tadpole merging to frog
Caterpillar morphs to butterfly
I am changing, too.
What will I ultimately be?
Beauty or the Beast?
Choose carefully, Dear Ones.

View original post

Leave a comment

Filed under Uncategorized

NUMBER ZOO!

Apps For Mobiles Limited, kids, math, timestables

NUMBER ZOO: KIDS TIMETABLES

NUMBER ZOO!

Welcome to Number Zoo!

View original post

Leave a comment

Filed under Uncategorized

Mad Science Summer Camp Fair

Source: www.madscience.org

Mad ScienceSummer Camp Fair

Chandler Preparatory Academy

Alma School / Warner Rd Chandler

24th February 10:00AM-2:00PM

Summer Camps

Take advantage of early Summer Camp registration big discount that day only

Register your kids now and save!

Discounts are for the camp fair days only.

Save time by registering in person on this day.

We will be glad to see everyone at camp fair.

Tell your friends about this great opportunity as well.

For descriptions of the camps, or to register, click here.

Leave a comment

Filed under Mad Science

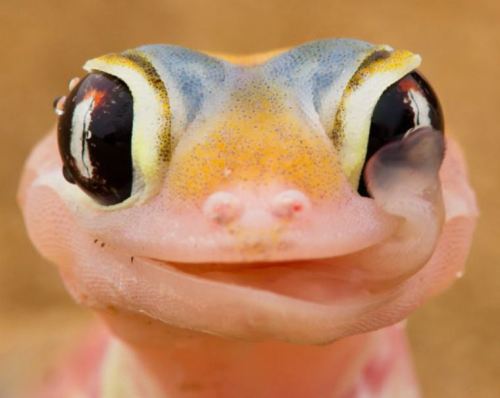
Namibia Gecko

Picture: Isak Pretorius / National News and Pictures

Picture: Isak Pretorius / National News and Pictures

Source: www.telegraph.co.ukA gecko licks the morning dew off its eyeballs. This gecko is found on coastal sand dunes in Namibia. The nocturnal reptiles collect water on their eyeballs in the early morning when a mist bank descends as cool coastal air hits warm desert air. Then they lick it off to have a drink. It took photographer Isak Pretorius three days in to get the licking picture, following gecko tracks across the dunes through the mist.

Leave a comment

Filed under wildlife

VALLEY YOUTH THEATRE – How I Became a Pirate

Source: www.vyt.com

Opens to Rave Reviews
Sam Primack…shines like the beacon at the front of a train running full steam ahead. – David Appleford, KEZ 99.9 fm
Sam_ISO_HIBAP_11Oct2012  It seemed adults laughed more than children…making me wonder whether “How I Became a Pirate” is a treasure still buried in a chest marked “children’s theater” – Lynn Trimble, Raising Arizona Kids

HIBAP_11Oct2012_013 altJeremy Jacob (Primack) joins Braid Beard and his krewe played by Bobb Cooper, William Diehl, Luke Ottinger and Joey Iannitelli; pirates not shown are played by Austin McMains, Tim Oakes and Emmanuel Aire.

How I Became a Pirate

runs Oct. 12 through 28

Order your tickets

by calling 602.253.8188 x2

Purchase a ticket for the show on Friday, Oct. 26 and
redeem your stub for $2.00 Off General Admission to
Arizona Science Center
Redemption offer expires Nov. 26, 2012

Leave a comment

Filed under How I Became a Pirate, VALLEY YOUTH THEATRE

Sticks and Stones: 5 Outdoor Craft Ideas

Source: www.parents.com

by Mark MantegnaTree Tapestry

This weaving project looks lovely as a mobile, but you can also use it as a net for catching fairies. (Note: Results not guaranteed.)

You’ll need a sturdy, Y-shaped branch. To make the loom’s warp (the strands that act as the foundation of the weaving), tie the end of a ball of yarn near the base of the branch’s fork. Wrap the yarn once around one leg of the fork, then cross to the other leg and wrap the yarn once around it. Repeat, keeping the yarn fairly tight, until you reach the ends of the fork. Tie off the yarn.

For the weft (the yarn you weave through the warp), thread a piece of yarn that’s about five times the length of the branch into a plastic yarn needle. Tie the end of the yarn to the bottom-most thread of the warp. With the needle, pull the yarn in and out of the warp. It will seem a little strange at first because half the warp threads will be higher than the others — just treat them as though they were flat. When you’ve used up the length of yarn, tie another piece to the end and continue weaving. When you’re done, tie the yarn end to the warp or just tuck it into the tapestry.

by Mark MantegnaPebble Plaque

This project starts with a trip outdoors to collect a basket of small, beautiful stones for an all-natural mosaic. Make sure the pebbles are clean and dry before you press them into the dough.

When you have your pebbles, mix up the salt dough. Our recipe makes enough for three 6-inch-round plaques.

You will need:

3 cups flour

1 cup salt

1 1/4 cups water (plus up to an additional 1/4 cup, as needed)

Use an electric mixer on medium speed to beat the ingredients together until a ball forms. If the mixture is still crumbly, add more water.

Knead the dough until it?s smooth. Divide the dough into three balls. Place each ball on a piece of foil and flatten it into a disk. Press pebbles into the dough to create a design.

Heat the oven to 275 degrees. Transfer the foil and dough onto a baking sheet. Bake the plaques for two hours, then let them cool completely. Check to see if any pebbles are loose; if so, remove them, add a drop of tacky glue, and replace them.

by Mark MantegnaStick Figures

The designs of these wild creatures were partly inspired by animalitos, brightly-painted sculptures made in Oaxaca, Mexico.

Find a fallen branch or stick with distinctive features, such as knots or forks. Clean the stick, and if the bark is loose, remove it. Cover the stick with white acrylic paint and let it dry. (The base coat will make your final colors much brighter.) Paint your creature. Add yarn hair and tails with tacky glue.

by Mark MantegnaThe Yarney Stone

Wrap colorful yarn around smooth rocks to make artful objects that are satisfying to stack or simply to admire.

Brush a ring of tacky glue around the middle of a clean rock. Starting from the center, wrap yarn around the rock, spiraling toward one end. Add more glue as you go. Repeat the process to cover the other half, again wrapping from the center to the end.


By Mark MantegnaRocky the Hedgehog

You’ll want just the right rock for this spiky guy. Ours is oblong and about 6 inches long. To protect your table from scratches, glue felt to the bottom of the stone. Brush a generous amount of tacky glue around the middle and press dry pine needles in it. The needles should point toward the tail of the hedgehog. Glue a second row of needles in front of the first, leaving a blank space for the face. For ears, glue on small pinecones or pebbles. Add a face with either black acrylic paint or a permanent marker.

Originally published in the August 2012 issue of FamilyFun magazine.

Leave a comment

Filed under Crafts, Outdoor

Mad Science Experiment – Buggy Pooters

Source: Mad Science | 8350 E Evans Drive B5 | Scottsdale | AZ | 85260

Banner

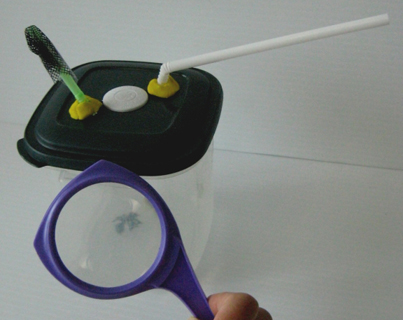
Create an insect catch & release device!

What you need

2 fat flexible straws, scissors, a nylon stocking, a small, clear jar with lid, hammer, nail, modeling clay, tape, an adult helper

What you do

1. Ask an adult to punch two holes in the lid. The straws need to fit in the holes.

2. Cut one straw so that the arms on either side of the bend are the same length. Stick the straw through one of the holes in the lid. Cover the inside end of the straw with a piece of the stocking.

3. Stick the short end of the second straw into the lid and seal around it with modeling clay. Screw the lid firmly onto the jar.

4. Hold the open end of the longer straw over some small insects and suck gently through the shorter straw. The insects will be drawn into the jar.

5. Study the insect with a magnifying glass. How many legs does it have? What color is it? Can you see any hairs? Look at their antennae, mouthparts, and color patterns.

6. When you are finished, return the insects to where you found them.

What’s going on?

You made a pooter! A pooter is a device scientists use to pick up small objects, like insects, without hurting them. It is a miniature vacuum cleaner that uses your lungs as the vacuum. When you suck through the short end of the straw, you are creating a vacuum inside the jar. The air around the opening of the long straw is drawn into this vacuum and any insect near the opening will be drawn in as well.

Leave a comment

Filed under Experiment - Buggy Pooters, Mad Science

Peep S’mores!!!

Source: quick-dish.tablespoon.com – by gourmetmom

Got leftover Peeps? Check out the cleverest way yet to use ‘em up!

A few days after Easter, after the chocolate bunnies are eaten and all the jelly beans (except the black ones!) are gone, among the plastic Easter grass I’ll usually find a package or two of Peeps.

Don’t get me wrong, we eat marshmallow Peeps like crazy at Easter, but I tend to buy way too many because they are so darn cute!  Plus, they come in so many different colors, it’s impossible not to buy at least one package of each!

Peeps Colors

Peeps have been a tradition at our house since I was a little girl.  In fact, my dad would buy a ton of extra packages and put them in his closet until around the 4th of July when they were nice and stale, just the way he liked them.

Yuck!  I am not a fan of stale marshmallows, so we wanted to find a creative way to use those leftover Peeps while they are nice and fresh. Nature Valley Granola Thins to the rescue in these colorful, yummy Peeps S’mores!

Granola Thins for S'Mores

These crispy squares come preloaded with chocolate and have a fantastic crunch.  When combined with delicious Peeps, you get one colorful tower of s’mores!

S'Mores with Colorful Peeps

All you need to do is take one square of Nature Valley Granola Thins (the Dark Chocolate variety is our favorite!) and put a Peep on top.  Microwave for 10-15 seconds.

Microwave Peeps for S'Mores

Add another Nature Valley Granola Thins on top and you’re done!

Dessert in under 30 seconds?  We have a new favorite treat at our house!  Now if you’ll excuse me, I need to go buy a few more packages of Peeps…

More Kid-Approved Recipes

These Peeps S’mores are fun for the kiddos. Try “s’more’ recipes with them to ring in Spring!

Leave a comment

Filed under Peep S'mores, Recipes

The Bunny Adventures

I spent my Saturday at the Scottsdale Stadium cheering on my favorite team – the San Francisco Giants! It was a perfect day for spring training – about 80 degrees and full of sunshine. I could barely wait for the first crack of the bat!

If you liked this post, I think you’ll enjoy my others! Check them out on my Homepage, or on the “Best of Bunny” link at the top. I love you all, loyal bunny fans!

View original post

Leave a comment

Filed under Uncategorized